Friday, August 26, 2016

GPOs - Disabling BitLocker Service Fails via Group Policy Preferences [Solved]


Today I've came across a strange issue when trying to disable "BitLocker Drive Encryption Service" with Group Policy Preferences (GPP).

Thanks to Helge Klein - Tools for IT Pros website this was really quick to solve!

After some reading, it seems it's related with the service permissions. This can be proven if you navigate to event viewer and you'll see a warning in application event log with an "Access Denied" for the Group Policy Services source.

"Googling" a little more about this, I've found out a way to solve this one.

So, follow theses steps:
  1. First of all, download SetAcl from here
  2. Now run following from the command-line (elevated)
    SetACL -on BDESVC -ot srv -actn ace -ace n:Administrators;p:full
And...it's all done! Now just execute "gpupdate /force" or reboot and then BitLocker Drive Encryption Service will be in "Disabled" state.

BlackViper.com - Known your OS services


Although this website exists for ages, and being known by the deployment and tweaking community for a long time, today, I'd like to show here a very nice resource for everything related with Windows services.

Created and maintained by Charles "Black Viper" Spark, BlackViper.com it's an extensive and comprehensive guide of Windows Services from Windows XP to Windows 10.
It's like having a library listing all possible services with information like, Display Name; Service Name; Default Status; etc.

Black Viper also gives information about the best values for tweaking; which ones are safe values, etc.

There are also some guides for tweaking which are a very nice source of information for that people trying to get best score for benchmarking software.

For me, this website it's mainly used to very very quickly get the service names i'm looking for. All in just one place.


Hope you enjoy it! ;)

Thursday, August 25, 2016

MDT - Showing More Windows PE Features


In Microsoft Deployment Toolkit (MDT) if you need to add additional features to your boot images, you'll go to your Deployment Share Properties and than you open Windows PE tab and select Features.

Here you'll find all features that Windows PE boot image has available and add/remove them.
For some strange reason there are some missing features here and therefore you aren't able to select them.

Like almost anything in MDT, the list of viewable features are controlled using an XML file,
Now, to show more features that you can add to your Windows PE boot images, follow these steps (assuming you've installed MDT on default install location):

  • Close MDT
  • Navigate to "C:\Program Files\Microsoft Deployment Toolkit\Bin\FeatureNames.XML"
  • Here, you'll find some features with an additional parameter (option="exclude")
  • Remove the option="exclude" tag
  • Save file and launch MDT
  • The "Windows RE Configuration" will now appear on Windows PE features

Note:
This is particularly important if you need to use Windows Powershell feature because some of it dependencies like WMI it's not present on this list by default.

Monday, August 22, 2016

Windows Deployment - Back to Basics - DISM - Drivers Management

Here's a post just to review some basic DISM (Deployment Image Servicing and Management tool) commands that are always useful when managing your base image:

Injecting drivers to boot.wim
DISM.exe /Mount-Wim /WimFile:C:\Mount\boot.wim /Index:1 /MountDir:C:\Mount\BootWIM
DISM.exe /Image:C:\Mount\BootWIM /Add-Driver /Driver:C:\Mount\Drivers /recurse
DISM.exe /Unmount-Wim /MountDir:C:\Mount\BootWIM /Commit


Viewing drivers on wim file
DISM.exe /Mount-Wim /WimFile:C:\Mount\boot.wim /Index:1 /MountDir:C:\Mount\BootWIM
DISM.exe /image:C:\Mount\BootWim /Get-Drivers


Windows Deployment - Back to Basics - MDT/SCCM Logs Locations


One of the most important thins when creating a Windows Deployment process is to know exactly where to look at when something goes wrong.

Over the years, Microsoft got their logging a lot better and much easier to read for MDT and SCCM.
Although the improvments, it's not always clear where to find this log files that can make you save precious time when troubleshooting.

So, heres a very quick table guide where to find the log files:

Timeframe Location
WindowsPE (before HDD format) x:\windows\temp\smstslog\smsts.log
WindowsPE (after HDD Format) x:\smstslog\smsts.log and copied to c:\_SMSTaskSequence\Logs\Smstslog\smsts.log
Windows (before SCCM Agent installed) c:\_SMSTaskSequence\Logs\Smstslog\smsts.log
Windows (after SCCM Agent installed) c:\windows\system32\ccm\logs\Smstslog\smsts.log
Windows x64 (after SCCM Agent installed) c:\windows\sysWOW64\ccm\logs\Smstslog\smsts.log
After Task Sequence finish c:\windows\system32\ccm\logs\smsts.log
After Task Sequence finish x64 c:\windows\sysWOW64\ccm\logs\smsts.log

Tuesday, August 9, 2016

Microsoft Edge - Enabling TCP Fast Open (TFO)


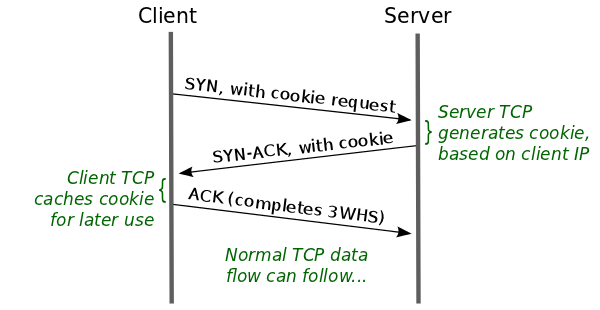
TCP Fast Open (TFO) is a new extension meant to replace the old T/TCP system.
According to Google, this new system can improve page load time by 10% to 40%. This can be achieve by reducing traffic back and forth between the client and the server.

In a very resumed way, the less latency you can have between two far away systems the faster the load times are.

Microsoft also write a detailed blog about this back in June:
Building a faster and more secure web with TCP Fast Open, TLS False Start, and TLS 1.3 Read more at https://blogs.windows.com/msedgedev/2016/06/15/building-a-faster-and-more-secure-web-with-tcp-fast-open-tls-false-start-and-tls-1-3/#Te0IgPhiPFmv0Rd9.99

Microsoft's main objective for Edge it's to end the gap that it had last years on the browsers world, and the strategy it's all about do the good things other competitor do and also stand out with nice new features.

So, TFO it's now available on Edge (you'll need Windows 10 Anniversary Update).

To enable this feature, follow this steps:
  1. Open Microsoft Edge
  2. In the address bar type
  3. Scroll down to Networking
  4. Check Enable TCP Fast Open
  5. Restart Microsoft Edge (just need close and open again)

Be aware this feature it's still experimental so there could be some issues.
If you experiencie any problems, just repeat the above process and uncheck the Enable TCP Fast Open option.

Monday, August 8, 2016

Windows 10 v1607 Now Available on VLSC


Microsoft just released a few hours ago the media files (ISOs)  for Windows 10 Enterprise v1607 a.k.a. "Windows 10 Enterprise with Anniversary Update." through it's Volume Licensing Service Center (VLSC) website.

So, follow the link below, sign in and get you Windows 10 Enterprise version 1607:
Microsoft Volume Licensing Service Center

Windows 10 ADK v1607 - WSIM Changes


With the introduction of the fresh Microsoft Windows 10 ADK v1607, there are also change to Windows System Image Manager (WSIM) and Unattend.xml files.

To a complete list of changes, here's the MSDN article:

Windows 10 ADK v1607 Available


Following the this early August release of Windows 10 v1607, Microsoft also made available a new version of Windows 10 ADK (Windows Assessement and Deployment Kit) v1607.

Grab the new version from the download link:
Microsoft Windows 10 ADK v1607


Remember that, like other versions of Windows 10 ADK, therer's no in-place upgrade, so you'll have to uninstall the previous versions you've install first.

Friday, August 5, 2016

Windows 10 Anniversary Update (v1607) - Forcing Update


So after 3 or 4 days your Windows 10 v1511 still not upgrading to v1607 (anniversary update).
Here's a quick and easy way to force update right now!
  • Go to Windows 10 update history website
  • Just click "Get the Anniversary Update now" button and download the upgrade tool
  • The tool we'll check your system before upgrade and...you're done! ;)

Windows 10 Anniversary Update - How to have It?


Now that Microsoft got out Windows 10 Anniversary Update, or Windows 10 v1607, here's to ways to download it.

First and more straightforward:
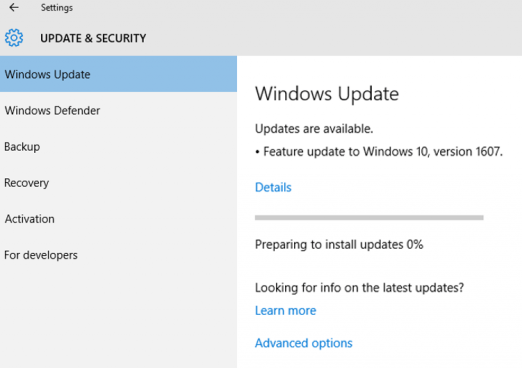
  • Go to Settings (Windows Key + I) > Updates & Security > Windows Update
  • In Windows Update click "Check for Updates" and the windows Anniversary Update should appear as "Feature update to Windows 10, version 1607".

Other way for later or offline install:
  • Go to Settings (Windows Key + I) > Updates & Security > Windows Update
  • Now click "Learn More" and you'll be taken to a Microsoft.com support page where you can download Windows 10 v1607 ISO file.


Windows 10 Anniversary Update Highlights


Starting rollout yesterday, the new Windows 10 Anniversary Update comes with some nice new features. Again, and following Microsoft's strategy since Windows 10 first alpha and beta versions, a lot of the new features were introduced using customer feedback, specially from the Windows Insider's program.

So, here are some of the highlighted features:

  • Windows Ink
    Allows users to quickly take notes, sketch on a screenshot or draw out something. For example, smart sticky notes can detect that you write down a date or time and Cortana asks if you want to create a reminder.
  • Windows Defender and Windows Hello
    Defender now has an option to automatically schedule quick scans. Windows Hello gets a more deep integration with Microsoft Edge for a quick and secure website login.
  • Microsoft Edge Power Increased Power Efficiency
    Edge got an update to it's power saving capabilities that ensures a more durable battery life, for example, reducing power consumptiong when view videos online.
  • Microsoft Edge...Extensions!! (finally)
    So it's finally here! The Windows 10 Anniversary Update finally brings extensions for Edge browser!
    There's not a lot too choose from, but this is just the beginning!
  • One Store to Rule Them All
    Following Microsoft's strategy of convergence, Windows and Xbox One now share the same Windows store. This means a more fluid and intuitive experience across platforms and also a seamless way to buy, subscribe, download from anywhere.

Finally, heres a video about this and other highlights directly from Windows Blogs website: