Thursday, December 23, 2010

Microsoft Hyper-V – Change VMs MAC Addresses

This is a tricky one…

I found out that some of mine Virtual Machines in different host machines were getting the same MAC Address.

With some research I found out the problem was using the same image (WIM) for deployment, that has already Hyper-V role installed.
After a little googling I’ve noticed that this is a problem that a lot of people are complaining.

So…there are to approaches to take here:

Creating new images
When creating new images for deployment, just delete the following keys before sysprep the machine:

HKLM\Software\Microsoft\Windows NT\CurrentVersion\Virtualization\MaximumMacAddress

HKLM\Software\Microsoft\Windows NT\CurrentVersion\Virtualization\MinimumMacAddress


Already Installed Machines
For this one, run the vbscript published at TechNet Forums:
Script to reset VM MAC Addresses 

After running the script don’t forget to restart the virtual machines.


Hope this helps some people like it really helped me! Smile

Technorati Tags: ,,,,

Wednesday, December 22, 2010

Problem Steps Recorder Tool – Command-Line Syntax

Introduced at Windows 7, Microsoft Problem Steps Recorder Tool (PSR), it’s a nice utility that let’s you take print screens / screenshots a littler further.


With this tool you can record what’s happening on your screen and get also some more info like, where did you clicked, what happened when you clicked, etc.
All that it’s then compiled on a very small file so you can send it through an e-mail for example.

Now…
Imagine you need to launch PSR through a command-line with certain configurations.
Here’s the syntax you can use:

psr.exe [/start |/stop][/output <fullfilepath>] [/sc (0|1)] [/maxsc <value>]
             [/sketch (0|1)] [/slides (0|1)] [/gui (o|1)]
             [/arcetl (0|1)] [/arcxml (0|1)] [/arcmht (0|1)]
             [/stopevent <eventname>] [/maxlogsize <value>] [/recordpid <pid>]

/start

:Start Recording. (Outputpath flag SHOULD be specified)

/stop

:Stop Recording.

/sc

:Capture screenshots for recorded steps.

/maxsc

:Maximum number of recent screen captures.

/maxlogsize

:Maximum log file size (in MB) before wrapping occurs.

/gui

:Display control GUI.

/arcetl

:Include raw ETW file in archive output.

/arcxml

:Include MHT file in archive output.

/recordpid

:Record all actions associated with given PID.

/sketch

:Create slide show HTML pages.

/slides

:Store output of record session in given path.

/output

:Store output of record session in given path.

/stopevent

:Event to signal after output files are generated.


PSR Usage Examples:

psr.exe
psr.exe /start /output fullfilepath.zip /sc1 /gui 0 /record <PID>
    /stopevent <eventname> /arcetl 1
psr.exe /start /output fullfilepath.xml /gui 0 /recordpid <PID>
    /stopevent <eventname>
psr.exe /start /output fullfilepath.xml /gui 0 /sc 1 /maxsc <number>
    /maxlogsize <value> /stopevent <eventname>
psr.exe /stop

Notes:
1.    Output path should include a directory path (e.g. '.\file.xml').
2.    Output file can either be a ZIP file or XML file
3.    Can't specify /arcxml /arcetl /arcmht /sc etc. if output is not a ZIP file.


Get more info about PSR at:
TechRepublic - Explore the Problem Steps Recorder in Windows 7

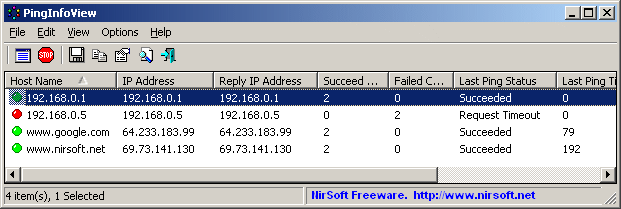
PingInfoView – Multi-Ping Application

Do you have a large number of machines that you just don’t know if they exist anymore?


Or…at least, you need to know if they’re still alive or have any network access?

Do you just need to ping a machine to know if it’s responding?
Well, just get a list of computernames ou ip addresses and let Ping Info View do it for you.

This fine tool has a lot of options like, ping within x to x seconds, export to various formats, etc.

Just take a look at Nirsoft’s PingInfoView

http://www.nirsoft.net/utils/pinginfoview.gif

Technorati Tags: ,,

Wednesday, November 24, 2010

Windows 7–No brightness management through mobility center or Fn keys

So, last week I’ve been reported from our helpdesk that users could not change brightness on the new machines (Toshiba Tecra M11).

They couldn’t change brightness through Fn + F6 / Fn + F7 keys combinations, neither through Mobility Center menu available on Windows 7. In Mobility Center the title even wasn’t there!

The thing here was that Administrators could change this and also use the Toshiba software.
Here I started to think about permissions and things like that.
Run all our GPOs with no success.

After a lot of research, I’ve found that this it’s some kind of common problem.

My first approach was to call Toshiba support to get some information about this.

I’ve also contacted our premiere Microsoft support about this.
After 2 days passed, Microsoft support engineer asked me to do a strange procedures:
”If the user experiencing problems belongs to the Remote Desktop Users local group, please remove it and give me some feedback!”

Although I though this was at least a really strange procedure, I’ve done it and…SURPRISE, it worked! Smile

Of course I needed some explanations from Microsoft about this, and I got it.

It seems some “strange people” from Windows team group, decided that Remote Desktop Users shouldn’t be allowed to change brightness. Smile

Fortunately, this can be solved exporting a reg file that changes the WMI permissions so that all users belonging to Remote Desktop Users local group could change…brightness!

Here it goes the code:
 

Windows Registry Editor Version 5.00

[HKEY_LOCAL_MACHINE\SYSTEM\CurrentControlSet\Control\WMI\Security]

"d43412ac-67f9-4fbb-a081-1752a2c33e84"=hex:01,00,04,80,B4,00,00,00,C4,00,00,00,\
  00,00,00,00,14,00,00,00,02,00,A0,00,07,00,00,00,00,00,18,00,1F,00,12,00,01,\
  02,00,00,00,00,00,05,20,00,00,00,20,02,00,00,00,00,18,00,1F,00,12,00,01,02,\
  00,00,00,00,00,05,20,00,00,00,22,02,00,00,00,00,14,00,1F,00,12,00,01,01,00,\
  00,00,00,00,05,13,00,00,00,00,00,14,00,1F,00,12,00,01,01,00,00,00,00,00,05,\
  14,00,00,00,00,00,14,00,1F,00,12,00,01,01,00,00,00,00,00,05,12,00,00,00,00,\
  00,18,00,1F,00,12,00,01,02,00,00,00,00,00,05,20,00,00,00,2B,02,00,00,00,00,\
  14,00,1F,00,12,00,01,01,00,00,00,00,00,05,04,00,00,00,01,02,00,00,00,00,00,\
  05,20,00,00,00,20,02,00,00,01,02,00,00,00,00,00,05,20,00,00,00,20,02,00,00

"479b20b4-5559-46fe-be97-7d222154421f"=hex:01,00,04,80,B4,00,00,00,C4,00,00,00,\
  00,00,00,00,14,00,00,00,02,00,A0,00,07,00,00,00,00,00,18,00,1F,00,12,00,01,\
  02,00,00,00,00,00,05,20,00,00,00,20,02,00,00,00,00,18,00,1F,00,12,00,01,02,\
  00,00,00,00,00,05,20,00,00,00,22,02,00,00,00,00,14,00,1F,00,12,00,01,01,00,\
  00,00,00,00,05,13,00,00,00,00,00,14,00,1F,00,12,00,01,01,00,00,00,00,00,05,\
  14,00,00,00,00,00,14,00,1F,00,12,00,01,01,00,00,00,00,00,05,12,00,00,00,00,\
  00,18,00,1F,00,12,00,01,02,00,00,00,00,00,05,20,00,00,00,2B,02,00,00,00,00,\
  14,00,1F,00,12,00,01,01,00,00,00,00,00,05,04,00,00,00,01,02,00,00,00,00,00,\
  05,20,00,00,00,20,02,00,00,01,02,00,00,00,00,00,05,20,00,00,00,20,02,00,00

Monday, November 22, 2010

What grills faster?? – Smartphone Comparison

With a lot of different smartphones OSs right now on market, the web it’s full of different comparison tests and benchmarks.

So, someone took it a little to serious and decided to make a new type of test.
If you live on an oven, take a look to which phone suits you better:

What grills faster?!

Wednesday, November 3, 2010

Using Intel vPro with HP Client Automation (HP CAE)

Intel vPro technology is a set of features built into a PC’s motherboard and other hardware.

Intel vPro is not the PC itself, nor is it a single set of management features (such as Intel Active Management Technology (Intel AMT)) for sys-admins.

Intel vPro is a combination of processor technologies, hardware enhancements, management features, and security technologies that allow remote access to the PC — including monitoring, maintenance, and management—independently of the state of the operating system (OS) or power state of the PC. Intel vPro is intended to help businesses gain certain maintenance and servicing advantages, security improvements, and cost benefits in information technology areas.

Intel vPro with HP CAE (rival of Microsoft System Center) helps to manage the IT infrastructure.

Here’s a nice video about this 2 technologies working together:
KVM Remote Control and HP Client Automation

Monday, October 25, 2010

Windows 7–Optimizing Windows Remote Assistance Experience

At work we’re now migration to Windows 2008 R2 / WIndows 7 at full speed.

After some tests outside our labs, we’ve noticed that Windows Remote Assistance was getting real slow. Everything took a lot of time to appear on screen.

Then I’ve found out a Group Policy Object (GPO) that helped us to get everything more smooth and clean.

The policy it’s called “Turn On Bandwidth Optimization”

Access it through:
Computer Configuration | Administrative Templates | System | Remote Assistance

Here’s the full description:

This policy setting allows you to improve performance in low bandwidth scenarios.

This setting is incrementally scaled from "No optimization" to "Full optimization".  Each incremental setting includes the previous optimization setting.

For example:

"Turn off background" will include the following optimizations:
No full window drag
Turn off background

"Full optimization" will include the following optimizations:
Use 16-bit color (8-bit color in Windows Vista)
Turn off font smoothing(not supported in Windows Vista)
No full window drag
Turn off background

If you enable this policy setting, bandwidth optimization will occur at the level specified.

If you disable this policy setting, application-based settings will be used.

If you do not configure this policy setting, application-based settings will be used.


We’re using “Full Optimization” option.

Fell free to give some feedback about your experiences with this!

Friday, October 1, 2010

Windows Live Essentials 2011 Launched Today!

Microsoft made available today it’s latest version of Windows Live Essentials (2011).


This version comes with the following features/software:

.: Messenger
.: Photo Gallery
.: Movie Maker
.: Mail
.: Writer
.: Family Safety
.: Windows Live Mesh
.: Messenger Companion
.: Bing Bar
.: Outlook Connector Pack
.: Microsoft Silverlight

Take a look, get more info and download the suite:
Microsoft Windows Live Essentials 2011

Also, if you want to full installer (155MB) here’s the link:
Microsoft Windows Live Essentials 11 (Offline Installer)

Monday, September 20, 2010

Changing the Default User Account Picture

First things first…

The default user account picture I’m referring too it’s the one that a new user get’s when it’s created.
This pictures appears on the logon screen and also on your start menu.

Here’s an example:


This picture must be:
Format: BMP
Size: 128x128 pixels

If you have another picture and want it to be the default picture for every new user, just copy it to:
c:\ProgramData\Microsoft\User Account Pictures\user.bmp

The picture must have exactly the same name (user.bmp) so you’ll need to overwrite the default one.

Driver Injections on MDT 2010

One of the great things since Windows Vista deployment it’s the way Microsoft made easy to deploy machines with different hardware types.
Windows Deployment Services (WDS), specially on Windows 2008 R2 also helped a lot.

But…sometimes you’ll need to inject drivers directly on the wim file.

Lars Krogh talked about this on his great blog, when he talked about how he accomplish this with the need of using a database on MDT.

Take a look on it’s article here:
MDT 2010: Driver injections (by Lars Krogh)

E-Reading – Deployment Fundamentals: Deploying Windows clients using MDT 2010 Lite Touch (Volume 1)

Although I like to read books on my PDA or notebook, I also like to read on the old fashioned paper.
I believe that people from TrueSec also thinks this way and a new book as come out.

I know that this coming a little late but I’m finally taking care of my mailbox so, there are some old news that I would like to share.

This books (Deployment Fundamentals: Deploying Windows clients using MDT 2010 Lite Touch (Volume 1)) it’s an easy and comprehensible peace of culture for everyone that it’s starting on Windows / Windows 2008 R2 deployments.
It’s also a good reference for everyone that work on deployments on a day-basis. There’s always something you discover there.

So, take a look at it on Amazon:
Deployment Fundamentals: Deploying Windows clients using MDT 2010 Lite Touch (Volume 1)

Get a quick look inside

Friday, September 17, 2010

VBScript – Verify TPM Status

I’m at the moment preparing a massive rollout of Microsoft Windows 7 for 10.000 machines.
One of the goals it’s to activate Bitlocker on all desktops and laptops.

While on testing phase, we’ve noticed that most of the time the installation teams forgotten to make the proper TPM changes on BIOS.
So, we’ve decided to create a VBScript to verify if the changes we’re made.
While TPM isn’t initialized and activated the installation doesn’t continue.

So, here’s the script:
(note: this script also verifies if the scripts is running on a virtual machine. If so, it doesn’t continue)

'-------------------------------------------------------------------------'
'  Variables And Objects Initialization                                   '
'-------------------------------------------------------------------------'
Err.Clear

Set wshShell = WScript.CreateObject("WScript.Shell")
Set Network = CreateObject("WScript.Network")
Set FSO = CreateObject("Scripting.FileSystemObject")

Set objWMIService = GetObject("WinMgmts:{impersonationLevel=impersonate,AuthenticationLevel=pktprivacy}//" & "." & "\root\CIMV2\Security\MicrosoftTpm")
Set objItems = objWMIService.InstancesOf("Win32_Tpm")

strScriptName = WScript.ScriptName
strScriptRunTime = FormatDateTime (Now,0)
strComputerName = Network.ComputerName
LoggedUser = Network.Username

strSystemManufacturer = wshShell.RegRead("HKEY_LOCAL_MACHINE\SYSTEM\CurrentControlSet\Control\SystemInformation\SystemManufacturer")

aspas = Chr(34)

'-------------------------------------------------------------------------'
'  MAIN                                                                   '
'-------------------------------------------------------------------------'

'Verify if Virtual Machine
If strSystemManufacturer = "VMware, Inc." or strSystemManufacturer = "Microsoft Corporation" Then
     WriteLog (strScriptName & " - Virtual Machine detected - TPM verification not needed.")
     WScript.Quit
End If

'Verify TPM Status
For Each objItem in objItems
  strTPMOn = True
  strTPMEnabled = objItem.IsEnabled(A)
  strTPMActivated = objItem.IsActivated(B)
  strTPMOwned = objItem.IsOwned(C)

    If (strTPMOn = True) Then
        WriteLog (strScriptName & " - TPM Powered On.")
    Else
        WriteLog (strScriptName & " - TPM not correctly configured - TPM not Powered On.")   
    End If

     If A Then
         WriteLog (strScriptName & " - TPM Enabled.")
     Else
         WriteLog (strScriptName & " - TPM not correctly configured - TPM not Enabled.")
     End If

    If B Then
         WriteLog (strScriptName & " - TPM Activated.")
     Else
         WriteLog (strScriptName & " - TPM not correctly configured - TPM not Activated.")
     End If
Next

'-------------------------------------------------------------------------'
'  ERROR CONTROL                                                          '
'-------------------------------------------------------------------------'

If Err.Number = "0" Then
    WriteLog (strScriptName)
Else
    WriteLog(strScriptName & " - ERRO" )
    WriteError(strScriptName & " - Error Number=" & err.Number & " | Error Desc.=" & err.Description)
End If

'-------------------------------------------------------------------------'                                                                        '
' FUNCTIONS                                                               '
'-------------------------------------------------------------------------'

'************************************'
' WRITELOG                           '
'************************************'

Function WriteLog(Msg)
  Dim objTextLog
  if FSO.FileExists("C:\SetupLogs\Settings.log") Then
    Set objTextLog = FSO.OpenTextFile("C:\SetupLogs\Settings.log", 8)
  Else
    Set objTextLog = FSO.CreateTextFile("C:\SetupLogs\Settings.log")
  End If
  objTextLog.WriteLine "[" & FormatDateTime(Now, 0) & "] " &  Msg
  objTextLog.Close

End Function

'************************************'
' WRITEERROR                         '
'************************************'

Function WriteError(Msg)
  Dim objTextLog
  If FSO.FileExists("C:\SetupLogs\SetupErrors.log") Then
    Set objTextLog = FSO.OpenTextFile("C:\SetupLogs\SetupErrors.log", 8)
  Else
    Set objTextLog = FSO.CreateTextFile("C:\SetupLogs\SetupErrors.log")
  End If
  objTextLog.WriteLine "[" & FormatDateTime(Now, 0) & "] " &  Msg
  objTextLog.Close
End Function

Technorati Tags: ,,,

Thursday, September 16, 2010

Microsoft Internet Explorer 9 Beta – Download Available

Microsoft took today another step before RTM version of it’s new browser version.
IE9 Beta it’s now available for download.

Experience a more beautiful web

After long interruption between versions 6.0 and 7.0, looks like Microsoft it’s finally getting the right speed for launching new versions of IE, and getting the focus where their competitors are good and they are not.

Well…I can somehow understand why it’s more complicated for Microsoft to launch new versions in short time between them. IE it’s probably the most used browser on the enterprise world so…this can be really a nightmare for IT Admins and Developers to keep up and test everything again.

Now, for what really matters…here are some of the new features in IE9 Beta:

Chrome Like Streamlined Design
Like I said before, Microsoft it’s paying attention to what the others are doing well, so this new compact/minimalist user interface make the navigation more graceful.

Just a short note about the Back button, to say that the bigger size reflects a market study from Microsoft that states that Back button it’s used a lot more times then Forward button.
When I think about it…errr…yes this is absolutely true, isn’t it?

Download Manager
Hmmm, don’t you smell something here?
An incorporated download manager where you can see all current and past downloads, cancel, pause them, clear the download  list history, etc.

This is getting ridiculous but, here I’ve to say that, Microsoft it’s looking the neighbors house…

Enhanced Tabs
With this feature basically you can put two opened tabs side-by-side


New Tab Page
Now when you open a new tab on the browser instead of going to your home page, you get a list of the most viewed websites.
Ok…I just can’t avoid this…does this feature makes you think on another browser?


Hardware Acceleration
In my modest opinion, this is one of the most important new features in IE9.
Hardware acceleration means IE will use the power of your graphics card (GPU) to enhance some heavy task like video streaming, online gaming and a lot more.

Everyday web pages have more rich and complex content, so in near feature, using the GPU will be trivial and probably get a better experience while browsing.


So, if your curious to test this features, download it and get more information:
Microsoft Internet Explorer 9 Beta

Saturday, August 21, 2010

Solution for Windows Live Messenger Error Code 81000395

Today since late afternoon I could not connect to Windows Live Messenger.
Always getting an error code 81000395 while trying to login.

Solution was found almost in seconds:

  • On the logon screen select your account
  • Click on the option “Forget Me” (this will “delete” your username and password from WLM)
  • Now, input your username and password again

For me this worked like a charm!

Thursday, August 19, 2010

WDS Error - “Windows cannot install required files (…)”– Error code: 0x80070570 – Workaround

While I’m writing this post I’m just thinking that this really may help someone like it helped me last week.

First things first:

.: Microsoft it’s over this one because are a lots of clients complaining about it
.: This is not a solution but a workaround until Microsoft folks don’t find a real solution
.: I tested this solution over 3 different machines
.: Don’t know why but I’ve installed a new machine on VMware ESX and this problem didn’t happened
.: This happened to me when I’ve created a new machine and also when I deleted previous image from a WDS image group

Now…this is the scenario:

You install a brand new machine with Windows Deployment Services, you copy a wim file from another machine, not directly from RemoteInstall folder but from DeploymentShare\Captures for example, and when you try to deploy the image from the new machine you get an error like this one:

mlnua0

No matter what you do, you always get this error.

Now, the really strange thing here is that supposedly the wim file should contain every single file you need to do the deployment.

The workaround:

I’ve managed to workaround this issue using a simple solution.
I’ve copied the file Res.RWM located on every imagegroup, on a working machine to the new machine. This file exists at RemoteInstall\Images\ImageGroupName and it’s like an index file of all images that were published on the WDS.

What really intrigues me is that on a new machine the index just contains information about the first image you’ve put there, but well…that’s not enough.

Why? This is what Microsoft is investigating… Smile


Just hope this helps everyone that’s getting crazy about this error.
As soon as I get any more info/solution about this, I’ll post it here.

Wednesday, August 18, 2010

Microsoft Baseline Security Analyzer 2.2 Released

Ok, this one it’s a little off the time but I just could post it before.

After a long time without any updates, Microsoft launched small upgraded version of Microsoft Baseline Security Analyzer (MBSA).

This new version hads support to Windows 7, Windows 2008 R2 and also corrects minor issues reported by customers.
There’s a x86 and a x64 version.

You can download this nice software here:
Microsoft Baseline Security Analyzer 2.2

Monday, August 16, 2010

VBScripting Hyper-V – Create Virtual Network

Continuing the vbscripting for Hyper-V, here’s a another one.

This is about creating a virtual network and “assigning” it the physical network card.

Here it goes:

Option explicit
Dim HyperVServer
Dim SwitchFriendlyName
Dim TypeLib
Dim SwitchName
Dim InternalEthernetPortFriendlyName
Dim InternalSwitchPortFriendlyName
Dim InternalSwitchPortName
Dim InternalEthernetPortName
Dim ExternalSwitchPortFriendlyName
Dim ExternalSwitchPortName
Dim ExternalEthernetPort
Dim ExternalEthernetPorts
Dim ExternalEthernetPortName
Dim ExternalEthernetPortString
Dim ScopeofResidence
Dim WMIService
Dim VirtualSwitchManagementService
Dim Switch
Dim InternalSwitchPort
Dim ExternalSwitchPort
Dim InParam
Dim OutParams
Dim Job
Dim Test

‘Prompt for the Hyper-V Server to use
HyperVServer = InputBox("Specify the Hyper-V Server to create the internal virtual network switch:")

‘Get an instance of the WMI Service in the virtualization namespace.
set WMIService = GetObject("winmgmts:\\" & HyperVServer & "\root\virtualization")

‘Get the Msvm_VirtualSwitchManagementService object
set VirtualSwitchManagementService = WMIService.ExecQuery("select * from Msvm_VirtualSwitchManagementService").ItemIndex(0)

‘Get all possible physical network adapters that can be used for a switch
Set ExternalEthernetPorts = WMIService.ExecQuery("Select * From Msvm_ExternalEthernetPort WHERE IsBound=False AND EnabledState=2")

‘Build the string to ask what physical network adapter to use
ExternalEthernetPortString = "The following network adapters are available:" & chr(10) & chr(10)

for each ExternalEthernetPort in ExternalEthernetPorts
   ExternalEthernetPortString = ExternalEthernetPortString & ExternalEthernetPort.Name & chr(10)
next     
ExternalEthernetPortString = ExternalEthernetPortString & chr(10) & "Please type in the (exact) name of the network adapter you want to use for the external connection:"

‘Setup a loop to keep on asking for a network adapter until we get a valid response
Test = true
while test
   ExternalEthernetPortName = InputBox(ExternalEthernetPortString)
   on error resume next
   Set ExternalEthernetPort = WMIService.ExecQuery("Select * From Msvm_ExternalEthernetPort WHERE Name=’" & ExternalEthernetPortName & "’ AND IsBound=False AND EnabledState=2").ItemIndex(0)     
   If Err.Number = 0 Then
      Test = false
   End If
   on error goto 0
Wend

‘Get friendly name for the external virtual network switch (and the internal ethernet port)
SwitchFriendlyName = InputBox("Specify the name of the new external virtual network switch:")
InternalEthernetPortFriendlyName = SwitchFriendlyName

‘Set the friendly name for the internal switch port and external switch port
InternalSwitchPortFriendlyName = "InternalSwitchPort"
ExternalSwitchPortFriendlyName = "ExternalSwitchPort"

‘Generate GUIDs for the unique switch name, internal switch port name, internal ethernet port name and external switch port name
Set TypeLib = CreateObject("Scriptlet.TypeLib")
SwitchName = TypeLib.Guid
Set TypeLib = CreateObject("Scriptlet.TypeLib")
InternalSwitchPortName = TypeLib.Guid
Set TypeLib = CreateObject("Scriptlet.TypeLib")
InternalEthernetPortName = TypeLib.Guid
Set TypeLib = CreateObject("Scriptlet.TypeLib")
ExternalSwitchPortName = TypeLib.Guid

‘Create a new virtual network switch
‘Setup the input parameter list
set InParam = VirtualSwitchManagementService.Methods_("CreateSwitch").InParameters.SpawnInstance_()
InParam.FriendlyName = SwitchFriendlyName
InParam.Name = SwitchName
InParam.NumLearnableAddresses = 1024
InParam.ScopeofResidence = null

‘Execute the method and store the results in OutParam
set OutParams = VirtualSwitchManagementService.ExecMethod_("CreateSwitch", InParam)

‘Get the new switch object out of the results  
Set Switch = WMIService.Get(OutParams.CreatedVirtualSwitch)

‘Create a new internal switch port
‘Setup the input parameter list
set InParam = VirtualSwitchManagementService.Methods_("CreateSwitchPort").InParameters.SpawnInstance_()
InParam.VirtualSwitch = Switch.Path_.Path
InParam.FriendlyName = InternalSwitchPortFriendlyName
InParam.Name = InternalSwitchPortName
InParam.ScopeofResidence = null

‘Execute the method and store the results in OutParam
set OutParams = VirtualSwitchManagementService.ExecMethod_("CreateSwitchPort", InParam)

‘Get the new internal switch port out of the results  
Set InternalSwitchPort = WMIService.Get(OutParams.CreatedSwitchPort)

‘Create a new external switch port

‘Setup the input parameter list
set InParam = VirtualSwitchManagementService.Methods_("CreateSwitchPort").InParameters.SpawnInstance_()
InParam.VirtualSwitch = Switch.Path_.Path
InParam.FriendlyName = ExternalSwitchPortFriendlyName
InParam.Name = ExternalSwitchPortName
InParam.ScopeofResidence = null

‘Execute the method and store the results in OutParam
set OutParams = VirtualSwitchManagementService.ExecMethod_("CreateSwitchPort", InParam)

‘Get the new external switch port out of the results  
Set ExternalSwitchPort = WMIService.Get(OutParams.CreatedSwitchPort)

‘Pull it all together with a call to SetupSwitch

‘Setup the input parameter list
set InParam = VirtualSwitchManagementService.Methods_("SetupSwitch").InParameters.SpawnInstance_()
InParam.ExternalSwitchPort = ExternalSwitchPort.Path_.Path
InParam.InternalSwitchPort = InternalSwitchPort.Path_.Path
InParam.ExternalEthernetPort = ExternalEthernetPort.Path_.Path
InParam.InternalEthernetPortName = InternalEthernetPortName
InParam.InternalEthernetPortFriendlyName = InternalEthernetPortFriendlyName

‘Execute the method and store the results in OutParams
set OutParams = VirtualSwitchManagementService.ExecMethod_("SetupSwitch", InParam)

‘Check to see if the job completed synchronously
if (OutParams.ReturnValue = 0) then
   Wscript.Echo "External virtual network created."
elseif (OutParams.ReturnValue <> 4096) Then  
   Wscript.Echo "Failed to create external virtual network." & OutParams.ReturnValue
else 

   ‘Get the job object
   set Job = WMIService.Get(OutParams.Job)

    ‘Wait for the job to complete (3 == starting, 4 == running)
   while (Job.JobState = 3) or (Job.JobState = 4)
      Wscript.Echo "Creating virtual network. " & Job.PercentComplete & "% complete"
      WScript.Sleep(10000)

      ‘Refresh the job object
      set Job = WMIService.Get(OutParams.Job)
   Wend

   ‘Provide details if the job fails (7 == complete)
   MsgBox (Job.JobState)
   if (Job.JobState <> 7) Then 
      Wscript.Echo "External virtual network created."
      Wscript.Echo "ErrorCode:" & Job.ErrorCode
      Wscript.Echo "ErrorDescription:" & Job.ErrorDescription
   Else 
      Wscript.Echo "Failed to create external virtual network."
      Wscript.Echo "ErrorCode:" & Job.ErrorCode
   end If
end If

VBScripting for Hyper-V – Change Default Paths

After a while without any new articles here are some new things I’ve learned about Hyper-V.

This one it’s for everyone that needs to change the default Data and VHDs default locations.

Set objVWMIService = GetObject("winmgmts:\\.\root\Virtualization")
Set objVSMS = objVWMIService.ExecQuery("SELECT * From Msvm_VirtualSystemManagementService").ItemIndex(0)

Set objVSMSSData = objVWMIService.Get("Msvm_VirtualSystemManagementServiceSettingData").SpawnInstance_()
objVSMSSData.DefaultVirtualHardDiskPath = "D:\VirtualMachines\"
objVSMSSData.DefaultExternalDataRoot = "D:\VirtualMachines\"

Set objInputSet = objVSMS.Methods_("ModifyServiceSettings").InParameters.SpawnInstance_()
objInputSet.SettingData=objVSMSSData.GetText_(1)
Set objOutSet = objVSMS.ExecMethod_("ModifyServiceSettings",objInputSet)

if (objOutSet.ReturnValue = 0) Then
  Wscript.Echo "Changed the default VHD and Data Root"
elseif (objOutSet.ReturnValue <> 4096) Then
  Wscript.Echo "Failed to change the VHD and Data root to new values"
end If

Hope this helps!

Richard Smith LTI Walkthrough

Here it is a new MDT LTI walkthrough video from Richard Smith.

On this video Richard talks and explains the following topics:

  • Add operating systems, applications, drivers and packages to MDT
  • Configure Office 2007 into the build process
  • Create a MDT Lite Touch task sequence 
  • Setup a lab based deployment point
  • Create a customised build to a reference computer
  • Capture the reference computer as a customised WIM
  • Add the customised WIM back into MDT for deployment

    Download Link:
    Video Download

    Full post:
    Blog post link

  • How to Change “IT Organization” on Task Sequencer Dialog Box

    Here’s a tip for everyone that wants to change the default text that appears on the Task Sequence dialog box.

    The default text it’s “IT Organization” and to change it you just need to set a new value for the variable _SMSTSORGNAME on the customsettings.ini file.

    For example:

    [Settings]
    Priority=Default
    Properties=MyCustomProperty
    [Default]
    OSInstall=Y
    _SMSTSORGNAME=Frontslash Inc.

    Then, you just need to update your deployment point and that’s it.

    Task Sequences – Explained

    From who cames from Windows XP unattended installations, the new Vista deployment features mais seem a little strange, confusing and scary! That happened to me…
    But, that was before having some readiness of the BDD 2007/Microsoft Deployment documents. Now I’m a little less confused.

    One of the first things that made my head go around was the Task Sequencer. I’ve never worked with SMS but who did, told me it was something similar to what we call today Microsoft Deployment tools.

    Now, here it’s some info that I’ve extrated fromDeployment_Customization_Guide.doc about the task sequences that are set by default when you install MS Deployment:

    The Microsoft Deployment process occurs in phases that are defined in the TS.xml file. Task Sequencer parses the TS.xml file to identify the appropriate sequence for performing the deployment process. The phases defined in the TS.xml file include:

    Validate Phase
    Performs validation checks to make sure that the operating system installation can proceed; specifically blocks installation on server operating systems.

    State Capture Phase
    Gathers information from the configuration file, databases, and the local machine to determine how the image installation process should proceed, including whether there is enough space to do a local USMT state backup. The scripts also invoke the USMT Scanstate.exe command as appropriate.

    Preinstall Phase
    Confirms that the necessary information has been gathered in the State Capture Phase for the Refresh Computer and Upgrade Computer scenarios. In the New Computer and Replace Computer scenarios, the script gathers the necessary information in this phase because these scenarios do not perform the State Capture Phase. Also, a backup of the computer can be optionally performed for the Refresh Computer and Upgrade Computer scenarios.

    Install Phase
    Installs the target operating system on the target computers.

    Post Install Phase
    Updates the Sysprep.inf file, Sysprep.xml file, or Unattend.txt file with information gathered in the previous custom actions based on the operating system being deployed.

    State Restore Phase
    Invokes the USMT Loadstate.exe command to restore the user state that was previously backed up.

    OEM Information on System Properties

    Windows Vista changed a little the way you set OEM Information.

    Now, everything it’s “changeable” on a single registry key.
    Here it’s the way to do it:

    1. Navigate to the following registry key: HKEY_LOCAL_MACHINE\SOFTWARE\Microsoft\Windows\CurrentVersion

    2. Locate the entry OEMInformation

    3. Add the following string values:

    Key name: Logo
    Description: Path to your companies/enterprise logo (120 x 120 pixels and *.bmp format)
    Example: C:\Windows\OEM\logo.bmp

    Key name: Manufacturer
    Description: Your manufacturer’s name
    Example: Frontslash

    Key name: SupportHours
    Description: Your support hours and week days
    Example: Monday – Sunday – 8:00 – 18:00

    Key name: SupportPhone
    Description: Your support phone number
    Example: +3512232414

    Key name: SupportURL


    Description: Your support homepage
    Example: http://support.frontslash.com

    After adding the entry, just go to your system properties and check the changes you’ve made.

    Here’s an example of an exported OEMInformation registry key:

    Windows Registy Editor Version 5.00 [HKEY_LOCAL_MACHINE\SOFTWARE\Microsoft\Windows\CurrentVersion\OEMInformation]
    "Logo"="C:\Windows\OEM\Logo.bmp"
    "Manufacturer"="FrontSlash Inc."
    "SupportHours"="Monday - Friday - 08:30 - 18:00"
    "SupportPhone"="+3512234254"
    "SupportURL"="http://support.frontslash.com

    ShowMediaCenter may cause problems

    Some time ago a problem appeared on my unattended Windows Vista installation that caused some headaches.

    The error was:

    Windows could not parse or process unattend answer file [C:\Windows\Panther\unattend.xml] for pass [oobeSystem]. The setttings specified in the answer file cannot be applied. The error was detected while processing settings for component [Microsoft-Windows-Shell-Setup]

    After some research I’ve realized that the problem was an option called ShowMediaCenter (that stands for showing or not showing the Windows Media Center icon on the Start Menu) that I’ve changed to False.
    Because my Windows Vista is the Enterprise Version (and so, doesn’t have Media Center), this was causing an error on the answer file.

    So…if your Windows Vista version is not Home Premium or Ultimate, you should not configure this setting with no value.

    By the way, you can find this setting using Windows System Image Manager (WSIM) under:

    - Unattend -> 4 specialize -> x86_Microsoft-Windows-Shell-Setup_neutral -> WindowsFeatures

    Locale Settings (inc. KeyboardLocale) – Finally Resolved

    I’ve had some issues trying to set the locale properties properly.

    When tried to set the KeyboardLocale=pt-PT it allways set it it English (US).
    After some reading and tips I finally manage to overcome that issue. I’ve found the solution on a great blog from Ben Hunter (http://blogs.technet.com/benhunter/archive/2007/04/09/bdd-2007-tips-and-tricks-multiple-keyboard-locales.aspx) a Microsoft Consultant.

    So, here’s the solution:

    To solve this problem, update the KeyboardLocale line in the ZTIGather.xml file to set allow overwrites to true.

    <property id=”KeyboardLocale” type=”string” overwrite=”true”description=”Locale used for Keyboard, can be either 0409:00000409 or en-US format (default is OS Default)” />

    You then need to make sure that you skip the locale selection screen, otherwise it will override any values specified in the

    customsettings.ini. Here is an example of the rules you will need to skip this screen:

         SkipLocaleSelection = YES

         UserLocale = en-NZ

         SystemLocale = en-NZ

         UIlanguage = en-US

         KeyboardLocale = 0413:00020409;0413:00000409;0409:00020409;0409:00000409;1409:00001409

    When making this change you need to be aware of its effects. This will cause the last value gathered during rule processing to be the one used. So for example if you specify a KeyboardLacale in the database and it is also specified in the Default section then the last section processed will win(normally the first section will win), which usually means the values in the default section will win.


    Source: Ben Hunter’s Blog

    This also works good for other Locale settings as SystemLocale.

    By the way…for portuguese locale settings the code is pt-PT.

    CustomSettings.ini References

    CustomSettings.ini it’s a new file that can be used to customize the Windows Vista deployment using WDS (I believe SMS too).

    This file and the file bootstrap.ini are very useful to skip some of Windows Deployment Wizards. Here it’s t

    he Properties Reference website from Microsoft.

    http://technet.microsoft.com/en-us/library/bb490304.aspx

    I’ll paste here my “customized” CustomSettings.ini as soon as I finish it.
    I’m having a little trouble to change the keyboard layout, but I’ll work that tomorrow.